 | |||
|
On Board Air - Early Bronco Technical article by Greg Banfield, Editor Motoman's Madness | |||
|
| |||
|
For a long time I carried a nitrogen tank to refill my tires off-road. What ends up happening usually on extended weekends, I give away most of the air to charity cases that didn't have their own air. Not a problem, I just want to have enough for me, so I started the York Compressor project. When I bought the Bronco in 1990, it had an unfunctional AC system. I bagged everything except the compressor and the mounting hardware.. I found out it was the right kind of compressor to use as an air pump. Below is the different pieces and parts for on board air on my Bronco. |
|||
|
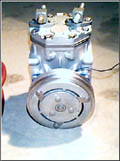
This is the York Compressor. I glass beaded it to clean it up, checked the clutch to make sure it still worked, and made sure there is still oil in the crankcase of the compressor. I will have to mount the compressor sideways to fit under the hood. I don't like the discharge side being the lowest, but we'll see how it works.
|
 |
 |
This is the hose that I ran to the front bumper. It has a quick disconnect and I keep a 20´ length of hose with me for air duties. |
|
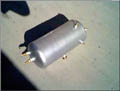
While I was junk yard hopping, I went to American Trucking and Salvage and picked up this tank for $10.00. I have all the fittings stripped off of it right now, but it came with a pop off valve. I will glass bead the tank and rinse the inside to get any oil out of it and paint it. Originally it was going to fit under the hood, but an inch too big in diameter, so I am relocating it under the truck . I will take pictures when I decide on a location. BONUS (FORD stamped on it!) |
 |
 |
The rear hose is long enough to reach all the tires incase I do not have the other hose with me. This works out great, because you are always with friends that need air, and I can run the front and rear hose at the same time. Or, I can connect the spare hose to the long rear hose and stretch almost 40´ to another vehicle. Which I have had to do on numerous occasions. |
|
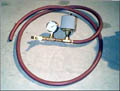
I bought a pressure switch (Part#5B419) $14.38 and check valve (Part# 6D914) $6.11 @ Grainger. They are on the web at www.grainger.com if you need them. I have a whole box of assorted fittings to put together the manifold that will be under the hood. |
 |
 |
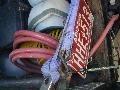
This is the manifold in working condition. The only problem that I have had with the system so far is the extreme heat from the headers cracked the clear plastic basket of the dryer unit. So far with the compressor on its side, I have only lost 1 tablespoon of oil. I put in 1 1/2 tablespoon of 30W back in the compressor. There is no way to dipstick the compressor on its side. |
|
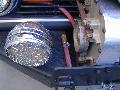
I mounted the compressor in the factory location. After carefully looking at the pulley situation, I decided not to go to just the alternator, but use an idler pulley and go off of the crank pulley which has an available slot. My fan is less than 1/16" away from the pulley on the compressor, so I will have to space it closer to the radiator. |
 |
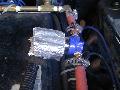 |
I went and bought another moisture seperator (dryer) from Home Depot. It is Campbell / Hausefeld unit for about $8-$13.00 . I tried to find the old box to get you a part number, but I must have thrown it away. As you can see in the picture, i wrapped the dryer in insulation and heat tape to prevent it from cracking again. |
|
|
|||
|
Ok now let's fast forward 10 years since I did the write up. I ended up pulling the air tank from underneath because I needed the space to do inboard shocks. I have been using the on board air with no tank and a long air hose and it's worked fine over the years. Talking with some friends we decided to spruce things up. | |||
|
My old manifold has done the job over the years. It's just not very ascetically appeasing to me. Plus I was missing a check valve, blow off valve and always worried that pressure switch would fail and create a bomb. |
 |
||
 |
Vince took a piece of 2" aluminum and cross drilled it creating a manifold that I could use. He did an assortment of 1/8" and 1/4" NPT holes for the following items:
| ||
|
Pressure Gauge,Filled,1 1/2 In,160 Psi |
 | ||
 |
Valve,Check | ||
|
Air Pressure Switch |
 | ||
 |
Valve,Safety | ||
|
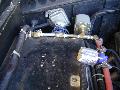
Vince installed studs in the bottom of the manifold so that I could mount it to the wheel well. I then hooked up the line from the compressor with the check valve in line (Right) The line to the rear tanks (Left rear) The line to the quick disconnect at the front of the truck (Left) |
 | ||
 |
 |
||
 |
Murph helped me by tig welding -6 fittings to my sealed rock rails on the truck. We T'd the lines together and ran them to the rear port of the manifold. | ||
|
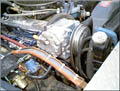
I am still using the 1973 York air conditioning compressor. Its mounted above the alternator on the factory 302CID bracket. Once in awhile I put a teaspoon of Schaffer's Synthetic Oil in the fill plug to keep it lubricated. I installed a K&N filter on the intake port of the compressor. Maybe in the future I will run a line to a cool air source instead of being right over the header. In this configuration I have not found any oil in the air tools. |
 | ||
 |
I ran a line out to the front of the Bronco. I keep a 20" length of hose with me for airing up duties. I can also run air tools to remove lug nuts and other truck repairs on the trail. I also welded a lug nut on the end of a scissors jack so I can use the impact to jack up the vehicle.
|
||
|
Running at about 1200 rpm on the Bronco I can air up three trucks with 35" and 37" tires with 10 psi to 30+ psi in minutes. It's a great feature to have on the trail. |
 |
||
|
| |||
| All part numbers correspond to Grainger part #. The hyperlinks should get you where you need to order those specific parts. Thank you to Vince, Murph and Steve for the inspiration, knowledge and cool tools! | |||
|
September 11, 2001 We will never forget! Please support our American forces! |
Property of Greg Banfield and may not be reproduced without the expressed written permission from me! Copyright © 1999-2012 All rights reserved
|
| |