![]()
![]()
|
"Hydroboost conversion for an Early Bronco" | |
 |
Parts:
Credits:
|
|
I have put up with 4 wheel manual brakes for the
last 20 years on my Bronco. I originally had 4 wheel drum brakes
and knew I needed to do something different. First I converted the
front drum brakes to disc brake using the popular Ch*vy conversion.
Click
here for that
write up. That was a major improvement. But I wanted more
braking power. Next I converted the rear drum brakes to Cadillac
disc brakes using a kit from
Jeff's Broncograveyard. Click
here for that write up. I
have really enjoyed the improved braking power from all wheel discs, but
they were still manual. I thought about going with a vacuum
booster set up, but often I find myself in situations where if the truck
stalled I still needed all the braking power I could muster....
here's where the hydroboost conversion showed its appeal. Vacuum
brakes give you one pump of the brakes before you get weak brakes.
Hydroboost has an accumulator built in and will provide power brakes for
3 pumps after the engine has died. Then they go back to manual
brakes... I know what those feel like so decided to do the Hydroboost
conversion. I busted out Google and started researching the conversion. My friend Steve had done alot of the research and told me to go to www.classicbroncos.com as there was many threads talking about the different options and setups we could go with.... on there I found a list of different donor vehicles I could get the Hydroboost unit from.... I gave that list to a friend of mine (Byron) who peruses the junkyards on the weekend. Wahlah!! Here's what he found! Hydroboost unit from a 1997 Powerstroke Ford Truck. | |
 |
|
| Being how this was the first weekend with the temps over 100° I set up as much shade as possible to work on the truck. | |
 |
|
| The next thing to do is to remove the stock master cylinder from the firewall. You have to disconnect the brake pedal from the rod. Remove the brake lines connected to the master cylinder and then remove the two bolts that hold the master cylinder to the firewall. | |
 |
|
 |
|
| The next thing to do was to disassemble the junkyard Hydroboost and Master Cylinder. There is a large nut that holds the mounting plate to the Hydroboost unit. Remove the nut and remove the plate. | |
 |
|
| Once the nut and mounting plate is removed clean and paint the Hydroboost unit. I took this time to clean up the firewall and paint it to make it look nice. Steve worked out the adapter plate for his and made me one. (YOU ROCK STEVE) You install the plate and put the big nut back on to hold it in place. | |
 |
|
| Steve did all his homework and told me to get a good pedal and not too sensitive to get a 1985 Dodge Diplomat master cylinder. Due to the length of the rod out of the Hydroboost I would need 1/2" adapter plate to go between the HB and MC. He was able to duplicate his efforts and made me one for my rig! | |
 |
|
| Now we could assemble the firewall plate to HB to adapter to MC......here it is installed. | |
 |
|
| The next thing we did was pull the AGR SuperPump from the canned ham reservoir. I went and bought a Saginaw PowerSteering pump from a 1974 Lincoln Mark IV with a dual return. We removed the pump and installed the dual return reservoir on the AGR SuperPump. | |
 |
|
|
Vince cleaning up the dual return reservoir...... |
|
|
|
|
| We then installed the pump in the Bronco with the new steel pulley. The aluminum pulley I got from James Duff had polished itself and wouldn't quit squeaking under load. Alot of people argue that a dual low pressure return is not needed. But it's a cheap investment to make sure the install and function goes well. | |
|
|
|
|
Now we started making the lines for the low pressure side... we slightly flares one end of the low pressure line on the steering box going to the cooler to make sure the hose doesn't leak. |
|
|
|
|
|
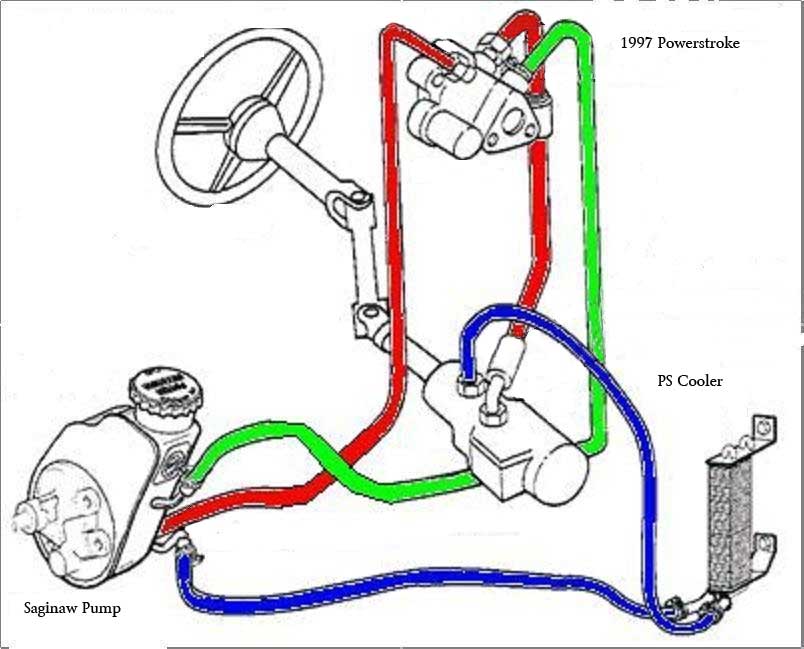
Here is a diagram of the routing of the lines to hook up Hydroboost. (Courtesy of JSmall on Classicbroncos.com) edited by Motoman for my application |
|
|
|
|
|
We made the high pressure lines from -6 reusable Aeroquip lines and fittings. We used a 5/8" and 11/16" to -6 fitting at the HB. The 11/16" to -6 adapter was impossible to find so Bryce at Alternative Hose, Inc made one from my original fitting (got it from junkyard with HB) and silver brazed a -6 fitting. I used a -6 (90°) fitting for the upper hose. I used a - 6 (45°) fitting for the lower hose. At the steering box I used a -6 (90°) fitting as well as the back of the power steering pump. |
|
|
|
|
|
|
|
|
|
|
|
Next I had to lengthen the actuator rod to get the right pedal height. I cut the original HB rod and welded a length of the original Bronco rod to it and reinstalled. It ended up being 5" long from the HB flange to the center on the "O" end. Then:
I had some issues getting the brakes bled correctly. But once all the air was out I took the Bronco for a ride and was amazed at how light of pedal pressure it takes now to stop the Bronco. I am super glad to have completed the conversion. Big thanks goes out to Vince for teaching me how to build Aeroquip lines and for all the hours in the heat assisting me and all the cool tools. Another big thanks goes out to Steve for helping me understand the process, building the adapter plate for the firewall, the adapter between the HB and MC and bending up the prettiest brake lines from the MC to the proportioning valve!!! Be sure to follow the routing in the illustration. It is correct. And thanks to all the guys who posted up their experiences on ClassicBroncos.com.
|
|
| Technical article and
photos are copyright © 2011, Motoman's
Madness. Do not duplicate without express permission from
Greg Banfield aka Motoman!
|
Return to Motoman's Madness |